
How to Remove a Pool Cover Without Making a Mess

Taking off a dirty winter pool cover looks intimidating, but it is entirely manageable once the heavy muck is gone. The trick is to pump off all standing water and sweep away leaves before unhooking a single strap. Once the top is clear, work with a partner to fold the cover like an accordion across the pool so no leftover sludge spills into the water below.
The exact steps change slightly based on the style of cover you have. Spring-loaded safety covers require a notched rod to lever tension off brass deck anchors, while solid tarps rely on draining deep puddles before removing perimeter water bags. Above-ground pools require loosening a hand-cranked side cable first. Taking the time to work in the right order prevents a messy spill and makes opening day easy.
The Short Version
- Pump off standing water and scoop debris first: Never detach the edges while water or leaves sit on top, because the weight will pull the cover down and dump muck into your clean pool water.
- Unhook the perimeter with the right technique: Use a long notched metal rod to lever tight springs off deck anchors, drain and slide off water tubes, or crank loose the cable ratchet on above-ground pools.
- Use an accordion fold with a partner: Stand on opposite sides and fold the cover back and forth in three-foot sections to keep any remaining dirt trapped between the folds instead of falling into the pool.
- Wash, dry, and pack it away: Scrub both sides, let the material dry completely in the sun to stop mildew, and pack it into a sealed plastic tub so rodents cannot chew through the fabric.
Clear the Surface: Pumping and Sweeping Before You Touch the Edges
The biggest mistake pool owners make in the spring is rushing to unhook the cover while water and leaves still sit on top. Standing water is heavy. A single gallon of water weighs a little over eight pounds. Just two inches of rain sitting across an average pool cover can easily weigh more than a thousand pounds. If you release the edges while that weight sits in the center, the entire cover will sag into the pool. The dirty swamp water, rotting leaves, and black silt will pour directly over the sides, turning your clear pool water green and adding days of vacuuming to your opening routine.
Getting the surface bone-dry and debris-free takes patience, but it protects your pool water, your pool liner, and your back. Follow these four steps before you touch a single strap, water tube, or cable.
- Set up a submersible pump in the deepest puddle: A submersible pump is a small water pump placed directly on the cover to drain rain. Place the pump on a plastic plate or a flat board in the lowest sag of the cover so the intake does not suck the cover fabric into the impeller. Plug the pump into an outdoor GFCI outlet (a protected ground-fault outlet with a weatherproof cover) located at least 10 feet back from the pool edge. Run your discharge hose far out into your yard or down a driveway slope away from your pool deck. Never step onto the cover while the pump is plugged into electricity.
- Scoop off wet leaves while the pump runs: Use a standard leaf rake net on an extended pool pole to gently scoop up wet leaves and twigs. Work slowly from the deck edges toward the center. Do not use metal yard rakes, flat shovels, or garden brooms with stiff wire bristles, as sharp corners will punch holes right through winter vinyl or safety mesh.
- Shift the pump to collect the remaining puddles: As the water drains, the cover will shift. Move the pump to any remaining low spots by pulling gently on the pump's discharge hose or tether rope from the deck. Keep pumping until only thin, damp films of water remain.
- Sweep away the dried dirt: Once the puddles are gone, give the cover an hour in the sun to dry out the remaining surface silt. Take a soft nylon pool brush and push the dried leaves and dirt toward the deck where you can sweep them into a dustpan. The lighter the cover is, the easier it will be to pull off without dropping anything underneath.
Unhook the Perimeter: Releasing Safety Springs, Water Tubes, and Cables
Once the top of the cover is clean and light, you can begin releasing the edges. The detachment process depends entirely on what kind of cover you have installed on your pool. Take your time during this step to avoid hand pinches and torn anchor straps.
For Inground Spring-Loaded Safety Covers
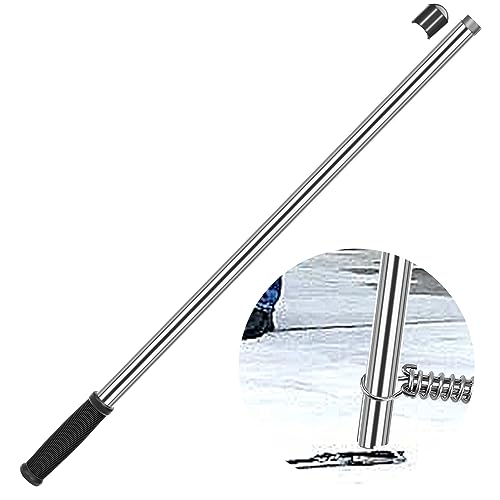
- Use a dedicated safety cover tool: A safety cover tool is a notched metal rod used to lever springs off deck anchors. Do not try to pry these springs loose with a flathead screwdriver or your bare hands. Safety cover springs hold dozens of pounds of tension and can snap back violently, crushing fingers or gouging your concrete deck.
- Hook, twist, and lean: Slide the hollow end of your notched removal rod straight down through the round ring on the safety spring. Fit the cutout notch at the bottom of the rod directly over the brass anchor post set into the concrete. Rotate the tool a half-turn so the notch locks onto the post, then lean the top of the rod toward the pool. The lever action will compress the spring and slide the metal ring up and off the anchor post smoothly.
- Work in an alternating pattern: Start at the corners of the pool, then release the springs along the long sides. Releasing the corners first relieves the strongest cross-tension, making the middle springs much easier to slide off.
- Screw down the brass anchors: An anchor is a brass screw socket set flush into concrete decking. After unhooking each spring, take a hex key or large flathead screwdriver and turn the brass screw down clockwise until it sits completely flush with your deck. Leaving brass anchors raised is an easy way to stub toes, trip guests, or tear the cover when you pull it across the patio. If your patio has collected grit over the winter, check our guide on cleaning your concrete pool deck to clear out anchor threads and keep the walking surface safe.
For Solid Inground Tarps with Water Bags
- Drain the water bags first: If you use long vinyl water tubes to weigh down a floating tarp, empty them before you move them. Uncap the fill valves and let the water spill onto the lawn or deck. Trying to lift full, heavy water tubes can rip the vinyl seams and strain your lower back.
- Slide the tubes straight backward: Lift each drained tube and move it away from the pool edge. Never drag water tubes across rough concrete decking or coping stones, because small pebbles will puncture the thin vinyl.
- Inspect the perimeter tarp edges: Make sure no corner of the tarp has folded over the coping or gotten pinched between pavers. Clear any small stones or twigs that gathered beneath the outer edges of the tarp over the winter.
For Above-Ground Pools with Cable and Ratchet Systems
- Release the cable winch: A winch is a hand-crank ratchet that tightens or loosens a pool cable. Locate the winch on the pool wall, lift the small locking ratchet lever, and crank the handle in reverse to release the tension on the perimeter steel cable.
- Pull the cable free: Thread the cable out of the winch drum, then walk around the pool pulling the wire free from the cover grommets. Roll the cable into a loose loop so it does not kink or tangle in the grass.
- Remove winter cover clips: If you used plastic wall clips to pin the cover edges under the pool top rails, snap them off one by one and set them in a bucket so they do not get lost in the lawn.
The Accordion Fold: Pulling the Cover Without Dumping Debris
Removing a pool cover is strictly a two-person job. If you try to pull a cover off alone, the far side will drag across the water, the middle will sag, and any leftover dirt or moisture will dump directly into the pool. Using an accordion fold keeps the dirty outside surface touching only itself, while keeping the clean underside completely isolated.
- Position partners on opposite sides: Stand on opposite edges of the pool near the shallow end. Grab the corners of the cover by the heavy reinforced webbing or the edge hem.
- Lift the first section: Lift the edge of the cover about waist-high, keeping the material taut between you and your partner. Walk forward toward the deep end roughly three feet, then fold that section back over itself. This creates your first pleat.
- Continue folding in three-foot pleats: Take another three-foot section, lift it together, and lay it down on top of the first fold. Walk the entire length of the pool toward the deep end, repeating this back-and-forth accordion fold. By keeping tension between both sides of the pool, the cover floats effortlessly on the surface of the water without dipping or taking on water.
- Slide the folded bundle onto the deck: Once you reach the far end of the pool, you will have a neat, three-foot-wide stack of folded fabric resting on the water near the edge. Grab the reinforced straps or edges together, count to three, and slide the entire stack straight up and out onto the deck or lawn.
Do not yank the cover across rough stone coping or metal edge tracks. Sharp coping edges can slice through vinyl liners or rip the stitching on safety covers. Lift the stack slightly as you bring it over the pool lip.
Clean and Store: Washing, Drying, and Packing the Cover
Once the cover is off the pool, do not roll it up and shove it into the corner of your garage while it is still wet. Trapped moisture breeds mold, mildew, and foul odors that can weaken the fabric threads over the summer. Follow this checklist to ensure your cover survives until closing season:
- Spread the cover flat on a soft surface: Unfold the cover on a clean patch of grass or a freshly swept driveway. Avoid laying it over gravel, sharp mulch, or rough asphalt that could puncture the material.
- Scrub away winter grime: Spray the entire surface with a garden hose using a standard nozzle. Use a soft-bristle nylon pool brush and a bucket of water mixed with a mild cover cleaner or gentle dish soap to scrub away dirt lines, algae stains, and bird droppings. Never use harsh bleach or abrasive household scrubbers, which degrade UV-protective coatings.
- Flip and rinse the bottom side: Turn the cover over and check the underside. While the bottom usually looks cleaner, it often carries chemical deposits or light algae films. Rinse it thoroughly with clean water.
- Let both sides air dry completely: Leave the cover in the sun until there is zero dampness left in the folds or seams. Turn it over halfway through the day so the bottom side dries just as thoroughly as the top.
- Pack the cover in a chew-proof bin: Fold the clean, dry cover into a manageable rectangle. Instead of using a mesh storage bag that mice can chew through, pack the cover into a heavy-duty plastic tote bin with a tight-fitting lid. Mice love nesting inside stored pool covers during warm summer months, and a plastic container keeps them out. For more details on protecting your pool equipment during the off-season, read our guide on storing a pool for the winter.
Tools That Make Cover Removal Easier
Removing a pool cover requires physical leverage, especially when dealing with safety covers and winter pool cables. The right tools protect your back, save time, and prevent costly damage to pool components.
For inground pools with safety covers, a long-handled stainless steel cover installation and removal rod is the most important tool you can own. These rods give you the mechanical leverage needed to compress heavy-duty deck springs with minimal effort. When choosing a removal rod, look for an extra-long handle between 28 and 31 inches. A longer handle lets you work comfortably from a standing position, taking painful bending strain off your lower back. Look for sturdy stainless steel construction that will not bend under load, and check that the notched cutout end fits standard deck anchor posts snugly.
If you own an above-ground pool, keeping a reliable hand-crank cable winch and a plastic-coated multi-wire steel cable on hand makes securing and releasing your cover simple. Look for winches with smooth ratchet gears that lock securely under tension and release cleanly without jamming. If your brass deck anchors have frozen in place after years of winter exposure, a brass anchor replacement and rethreading tool kit can help you loosen stuck screws or replace stripped sockets so your deck remains smooth and safe all summer long.

- VC Score10.0
BCP Score is a ranking system developed by bestcleanerproducts.com. BCP Score has no relationship or impact from any manufacturers or sales agent websites. Learn more
- BrandDECOHS

- VC Score9.8
BCP Score is a ranking system developed by bestcleanerproducts.com. BCP Score has no relationship or impact from any manufacturers or sales agent websites. Learn more
- BrandUQM

- VC Score9.6
BCP Score is a ranking system developed by bestcleanerproducts.com. BCP Score has no relationship or impact from any manufacturers or sales agent websites. Learn more
- BrandUprimu

- VC Score9.0
BCP Score is a ranking system developed by bestcleanerproducts.com. BCP Score has no relationship or impact from any manufacturers or sales agent websites. Learn more
- BrandWood Grip

- VC Score8.8
BCP Score is a ranking system developed by bestcleanerproducts.com. BCP Score has no relationship or impact from any manufacturers or sales agent websites. Learn more
- Brandscottchen PRO

- VC Score8.4
BCP Score is a ranking system developed by bestcleanerproducts.com. BCP Score has no relationship or impact from any manufacturers or sales agent websites. Learn more
- BrandLinstaine
- VC Score8.2
BCP Score is a ranking system developed by bestcleanerproducts.com. BCP Score has no relationship or impact from any manufacturers or sales agent websites. Learn more
- BrandYUNVI

- VC Score7.8
BCP Score is a ranking system developed by bestcleanerproducts.com. BCP Score has no relationship or impact from any manufacturers or sales agent websites. Learn more
- Brandscottchen PRO

- VC Score-
BCP Score is a ranking system developed by bestcleanerproducts.com. BCP Score has no relationship or impact from any manufacturers or sales agent websites. Learn more
- BrandTriceratops
Last update on 2026-10-08 / Affiliate links / Images, Product Titles, and Product Highlights from Amazon Product Advertising API
FAQs
Can one person remove a pool cover alone?
You should never try to remove a pool cover alone. Even when the top is dry, the material is bulky, awkward to carry, and prone to catching the wind. Pulling a cover solo almost always results in the edges falling into the pool, which dumps dirt into your water and risks tearing the seams on deck coping.
What should I do if a brass anchor is stuck in the concrete deck?
If an anchor screw will not turn down flush, spray the socket with penetrating oil and let it sit for twenty minutes. Use a wire brush to clear sand and grit from the threads, then insert your hex tool and tap it lightly with a rubber mallet to break the corrosion bond. If the threads are completely stripped, use a brass anchor extraction tool to pull the sleeve out and insert a fresh anchor.
How do I get fine silt off the top of a solid winter tarp without dumping it into the pool?
Drain as much standing water as possible with your submersible pump, then let the remaining mud dry completely in the sun. Once the mud turns into dry, powdery crust, push it toward the edges of the pool deck with a soft nylon push broom and scoop it up with a dustpan. Trying to sweep wet mud will only smear it across the tarp and make it heavier.
Is it safe to fold and pack a pool cover while it is still damp?
No, you should never store a pool cover while it is damp. Trapped water in folded vinyl or mesh breeds dark mold and mildew within days, which produces strong odors and permanently damages the fabric stitching. Always let both sides of your cover bake in the sun until completely dry before packing it away into a storage container.


How to Refinish a Fiberglass Pool

How Do You Keep Raccoons Out of Your Pool?

How to Fix Cyanuric Acid in Your Pool

How to Shape a Pool Cue Tip to Stop Miscues

12 Best Automatic Vacuum For Intex Above Ground Pool of 2026 To Keep Vinyl Floors Spotless

10 Best Automatic Pool Vacuum For Above Ground Pool of 2026 To End Manual Scrubbing

How Much Pool Clarifier Should You Use for Your Pool Size?

How Much Does a Pebble Tec Pool Cost to Build or Resurface?








