
How to Attach a Pool Vacuum Without Losing Suction

Fill the hose with water before connecting. Click the vacuum head onto the pole, attach the swivel end of the hose, and lower the head to the pool floor. Hold the open hose cuff against a return jet to push out all trapped air until bubbles stop rising. Filling the line with water keeps the pump from running dry and gives you instant suction the moment you plug it in.
The exact connection depends on your pool layout. Some systems pull suction through a dedicated wall port, while others work best with a vacuum plate placed over the skimmer basket to trap leaves. Small above-ground pools often need a simple rubber adapter cone to make a tight seal. Here is how to assemble each piece and get dirt moving without stalling your pump.
Gather your four basic vacuum parts before starting
Setting up a manual pool vacuum goes smoothly when all your gear is laid out on the deck before you touch the water. You need four basic pieces of equipment: a vacuum head, a telescopic pole, a flexible vacuum hose, and an adapter for your suction line. Having everything within arm's reach prevents you from dropping wet gear or letting air sneak into the system.
Inspect your vacuum head first. Vacuum heads come in different shapes, such as triangular or curved half-moon designs, and they feature different contact surfaces for different pool floors. If you have a vinyl liner pool or a smooth fiberglass pool, your vacuum head must have soft nylon brushes on the underside to glide smoothly without scratching or puncturing the floor. If you have a concrete, plaster, or pebble aggregate pool, look for a vacuum head with small wheels that roll easily across the rough plaster without grinding down the plastic body.
Check your telescopic pole next. The pole should have an adjustable aluminum body with functional locking cams (the plastic twist collars that lock the extending sections at your desired length). Make sure the pole locks tightly so it does not collapse while you push against water resistance.
Examine your vacuum hose closely. The hose must be long enough to reach from your skimmer or suction port to the farthest corner of the pool, with about 3 to 5 feet of extra slack. Take a look at the two ends of the hose, because they are not identical. One end features a swivel cuff (a rotating plastic collar that spins freely in a full circle). The other end is a fixed cuff (a rigid, stationary collar that does not twist). Knowing which end is which is essential for a tangle-free setup.
Decide whether you will use a vacuum plate or plug directly into the suction port. A vacuum plate is a flat plastic disc with a rubber gasket and a 90-degree elbow adapter that sits directly over your skimmer basket. Using a vacuum plate is the safest choice because it allows the skimmer basket to catch leaves and large debris before they reach your underground plumbing. If you do not have a vacuum plate, you will plug the hose directly into the suction hole at the bottom of the skimmer well.
Take a quick look at basic safety before you assemble the gear. Verify that your pool pump is plugged into a protected outdoor GFCI outlet (a ground-fault circuit interrupter with a weatherproof cover) and that the equipment pad is clear. Keep pets and small children away from the pool deck while you work, and never let anyone swim while vacuum equipment and long hoses are floating in the pool.
Attach the pole and swivel cuff on the deck
Assembling the vacuum on the deck keeps you from struggling with wet, slippery plastic near the water. Connecting the parts in the right order takes only a couple of minutes.
- Lock the vacuum head onto the pole. Look at the handle neck on the vacuum head. You will see a plastic V-clip (a flexible butterfly spring with two small white pins sticking out of the sides). Squeeze the two pins inward with your fingers and slide the open end of the aluminum pole over the plastic handle. Slide the pole forward until the two pins snap securely through the matching holes on the pole. Pull firmly on the pole to verify that the connection will not slip apart underwater.
- Attach the swivel cuff to the vacuum head. Pick up the end of the vacuum hose with the swivel cuff (the collar that rotates freely). Push this swivel cuff firmly over the raised suction port on top of the vacuum head. Twist the cuff slightly as you push down to create a tight friction fit. You must place the swivel cuff on the vacuum head rather than the stationary cuff. As you push the pole across the pool floor, the head turns and twists. The swivel cuff spins along with it, which prevents the hose from coiling into knots or flipping the head upside down.
- Lower the head and pole into the water. Pick up the pole with both hands and guide the vacuum head straight down into the shallow end of the pool. Let the head settle flat against the pool floor. Lean the upper end of the pole against the pool edge or deck railing so it stays firmly in place. Leave the unattached length of the hose laid out on the deck or floating on top of the water.
Fill the hose with water using a return jet
Before you plug the hose into your pool plumbing, you must prime the hose. Priming simply means filling the entire length of the hose with water to push out all trapped air. Pool pumps are built to pull water, not air. If you connect a hose full of air directly to your skimmer, that huge air bubble rushes through the pipes and into the pump pot. The pump will lose prime (suck air instead of water and stop pulling), causing the pump motor to run dry, overheat, and potentially melt internal shaft seals.
- Feed the hose into the pool. Starting from the end attached to the vacuum head, push the hose into the water hand over hand. Allow the hose to float loosely in wide coils across the pool surface. Submerging the body of the hose helps displace some of the trapped air naturally.
- Find an active return jet. Locate one of the return jets on the pool wall (the round nozzles that push clean, filtered water back into the pool). Make sure your pool pump is running on its normal filter cycle so water is actively pumping out of the jet.
- Hold the open cuff against the return jet. Take the open, rigid cuff at the free end of the hose and place it firmly over the return jet nozzle. Hold the cuff tight against the wall fitting with your palm and fingers so the force of the returning water flows directly down the inside of the hose.
- Watch for air bubbles at the vacuum head. As water rushes through the hose, it pushes the trapped air ahead of it. Look down at the vacuum head resting on the pool floor. You will see a massive burst of air bubbles boiling up around the vacuum head. This is completely normal and shows that the air is being forced out of the line.
- Wait until the bubbling stops completely. Keep holding the hose against the return jet for 15 to 30 seconds. When the bubbling at the vacuum head stops completely, the hose will feel heavy, cool, and firm in your hands. You may even feel the cuff push back slightly against your palm from the water pressure. The hose is now 100 percent full of water.
If your pool does not have strong return jet pressure or the wall fittings are shaped awkwardly, you can also prime the hose by hand. Take the open cuff and push the hose straight down vertically into the deep end of the pool, feeding it down foot by foot. As the hose sinks beneath the surface, the surrounding water pressure will force the air up and out through the top cuff until water fills the rim.
Keeping your vacuum gear clean makes priming much easier. If your equipment has been sitting in outdoor storage, learn how to clean algae from a pool hose safely so you do not blow old debris back into your clean pool water during setup.
Plug the full hose into the skimmer or wall
Once your hose is full of water, you must make the connection to the suction line without letting new air sneak inside. Follow the waterlock rule: never pull the open cuff out into the air. If you lift the cuff above the surface, gravity dumps the water right out of the hose and air rushes back in.
- Cap the cuff underwater with your hand. While the open cuff is still submerged near the return jet, slide the palm of your hand firmly over the opening. Keeping the cuff under the water surface, slowly guide the hose across the pool toward your skimmer opening.
- Route the hose to the skimmer. Bring the cuff right up to the skimmer mouth. You can feed the hose cuff through the front opening of the skimmer (over the floating weir door) or remove the skimmer lid from the deck and guide the cuff down through the top well. Feeding the hose through the front mouth is generally best because it avoids sharp 90-degree bends that can crimp the hose wall.
- Connect using your chosen method. Choose the connection style that matches your pool setup:
- Connecting with a vacuum plate: Keep the skimmer basket inside the skimmer well. Make sure the basket is free of leaves and resting flat. Lower the vacuum plate over the basket, keeping the rubber seal flush with the rim. Take your hand off the hose cuff underwater and push the cuff firmly onto the 90-degree elbow fitting on the plate. The suction from the pump will instantly pull the plate down, creating a tight seal.
- Connecting directly into the skimmer suction port: Remove the skimmer lid and lift out the skimmer basket. Look into the bottom of the skimmer well. In most pools, you will see two round holes. The back hole (closer to the pool equipment pad) connects to the pump suction line. The front hole connects to the main drain as an equalizer line. Place your hand near the holes to feel which one has active pull. Keep the hose cuff underwater, move your hand, and press the cuff directly into the active suction hole until it fits snugly.
- Connecting to a dedicated wall suction port: If your pool features a dedicated vacuum port on the pool wall below the waterline, walk the hose over to the port. Flip open the spring-loaded safety flap door underwater. Slide the rigid cuff or manufacturer hose adapter into the port until it locks securely into place.
- Check the pump strainer basket. Walk over to your equipment pad and look through the clear plastic lid on your pump. The pump pot should remain completely filled with water. A tiny air bubble the size of a coin is normal, but the pot should be full of rushing water. If the pot stays full, your vacuum is connected properly and you can begin cleaning.
Solve weak suction or air bubbles right at the pump
Even with careful steps, air can slip into the system or water flow can drop. You can solve most connection problems by checking a few specific points on the deck and at the equipment pad.
If your pump lost prime completely, you will hear the pump motor change pitch, turning louder and higher, and you will see the water level drop inside the clear pump lid. Turn off the pool pump immediately. Running a pump dry for more than a minute can warp the plastic housing and destroy internal motor seals. Disconnect the vacuum hose from the skimmer. Open the pump lid, dump a full bucket of water into the strainer pot until it spills over, inspect the lid O-ring to ensure it is seated, and screw the lid back on tight. Restart the pump and let it regain full circulation before trying the hose priming step again. If the pump still struggles to move water, check how to unclog a pool pump and restore water flow to clear any pine needles or leaves that may have slipped past the basket into the pump impeller.
If the vacuum head sticks to the floor like glue and feels impossible to push, the pump is pulling too much suction through a single line. This often happens on vinyl liner pools, where the head seals tightly against the slick vinyl. Walk over to your pool plumbing manifold (the set of pipes and lever valves in front of the pump). Slowly crack open the valve for the main drain or your second skimmer. Opening another line splits the suction, giving you plenty of vacuum pull at the head while allowing it to glide smoothly across the pool floor.
If you experience weak suction at the vacuum head, start by checking the baskets. Debris from the pool floor quickly packs into the skimmer basket or pump pot, choking the water flow. Turn off the pump, empty both baskets, and reconnect. If the baskets are clean, check the vacuum hose for physical damage. Look for splits, flat spots, or tiny cracks along the spiral ribs. An air leak on any section of the hose floating above water will suck air into the plumbing instead of water, ruining suction strength.
If you see a steady stream of tiny air bubbles blowing out of the pool return jets, air is leaking into the suction side of the system. Check the vacuum plate first. If the plate is tilted slightly, or if the skimmer water level dips too low and creates a whirlpool vortex inside the skimmer well, air gets pulled directly into the line. Add water to the pool if the water line is below the halfway point of the skimmer mouth, and press down on the vacuum plate to verify a flat, airtight seal.
Consider equipment upgrades that eliminate manual hose setups
Manual pool vacuuming gives you complete control over spot-cleaning algae and heavy dirt, but dragging long hoses, priming lines, and emptying skimmer baskets takes regular effort. Upgrading your equipment or choosing a cleaner built for your specific pool layout can make regular maintenance much simpler.
If you stick with a manual setup, upgrading to a heavier weighted vacuum head prevents the head from floating upward when you push the pole quickly. Make sure you select a head designed specifically for your pool surface. Heavy wheel designs roll freely over concrete, plaster, and pebble aggregate, while smooth-bristled heads glide safely across vinyl liners and fiberglass without catching on seams.
Automatic cleaners offer an alternative that reduces your time on the pool deck. Suction-side cleaners plug into your skimmer or suction port using sectional hoses and crawl across the floor using your main pump suction. Pressure-side cleaners connect to a dedicated water return jet, often powered by an extra booster pump, and collect leaves in their own attached sweep bag so your skimmer and pump baskets remain empty.
Cordless robotic pool cleaners provide the most convenient option because they skip hoses and pool plumbing entirely. These self-contained units run on internal rechargeable batteries, navigate using built-in drive motors and rubber tracks, and catch sand, leaves, and silt inside an internal filter basket. Because cordless robotic cleaners do not connect to your skimmer or suction ports, there is zero risk of pulling air into your plumbing or losing pump prime. When choosing an automatic or robotic cleaner, check the runtime, verify that the scrubbing brushes match your pool surface type, and confirm that the unit handles the total length and deep-end slopes of your pool.

- VC Score9.0
BCP Score is a ranking system developed by bestcleanerproducts.com. BCP Score has no relationship or impact from any manufacturers or sales agent websites. Learn more
- BrandINSE

- VC Score9.0
BCP Score is a ranking system developed by bestcleanerproducts.com. BCP Score has no relationship or impact from any manufacturers or sales agent websites. Learn more
- BrandSepetrel

- VC Score8.8
BCP Score is a ranking system developed by bestcleanerproducts.com. BCP Score has no relationship or impact from any manufacturers or sales agent websites. Learn more
- BrandAIPER
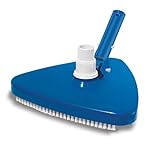
- VC Score8.8
BCP Score is a ranking system developed by bestcleanerproducts.com. BCP Score has no relationship or impact from any manufacturers or sales agent websites. Learn more
- BrandCREPRO

- VC Score8.6
BCP Score is a ranking system developed by bestcleanerproducts.com. BCP Score has no relationship or impact from any manufacturers or sales agent websites. Learn more
- BrandSwimline

- VC Score8.6
BCP Score is a ranking system developed by bestcleanerproducts.com. BCP Score has no relationship or impact from any manufacturers or sales agent websites. Learn more
- BrandPOOLWHALE

- VC Score8.4
BCP Score is a ranking system developed by bestcleanerproducts.com. BCP Score has no relationship or impact from any manufacturers or sales agent websites. Learn more
- BrandU.S. Pool Supply

- VC Score8.2
BCP Score is a ranking system developed by bestcleanerproducts.com. BCP Score has no relationship or impact from any manufacturers or sales agent websites. Learn more
- BrandPOOLWHALE

- VC Score8.0
BCP Score is a ranking system developed by bestcleanerproducts.com. BCP Score has no relationship or impact from any manufacturers or sales agent websites. Learn more
- BrandWYBOT

- VC Score7.4
BCP Score is a ranking system developed by bestcleanerproducts.com. BCP Score has no relationship or impact from any manufacturers or sales agent websites. Learn more
- BrandWYBOT
Last update on 2026-10-08 / Affiliate links / Images, Product Titles, and Product Highlights from Amazon Product Advertising API


How to Refinish a Fiberglass Pool

How Do You Keep Raccoons Out of Your Pool?

How to Fix Cyanuric Acid in Your Pool

How to Shape a Pool Cue Tip to Stop Miscues

12 Best Automatic Vacuum For Intex Above Ground Pool of 2026 To Keep Vinyl Floors Spotless

10 Best Automatic Pool Vacuum For Above Ground Pool of 2026 To End Manual Scrubbing

How Much Pool Clarifier Should You Use for Your Pool Size?

How Much Does a Pebble Tec Pool Cost to Build or Resurface?


