
How to Wire a Pool Pump Timer for 120 or 240 Volts?

Most pool owners assume wiring a timer box requires deep electrical knowledge and confusing schematics. In reality, the core job is straightforward: connect incoming power to the line terminals and wire the pump to the load terminals after shutting off the main breaker. Securing the bare or green ground wire to the grounding screw completes the circuit and keeps the system safe.
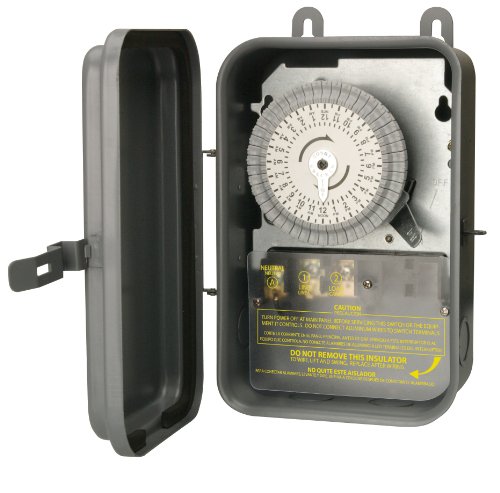
The exact hookup changes based on the voltage listed on your pump motor. A standard 120-volt system uses a single hot wire and a white neutral wire, while a 240-volt system relies on two separate hot wires. Digital timer boxes also need a dedicated neutral wire to keep their internal clock running, whereas classic dial clocks do not. Confirming these details beforehand protects the motor and makes the whole connection process smooth.
The Short Version
- Cut the power completely: Switch off the breaker at your main electrical panel, turn off any subpanel switches by the pool, and confirm the wires are dead with a non-contact voltage detector before touching anything.
- Identify your voltage setup: A 120-volt system uses one black hot wire and a white neutral wire, while a 240-volt system uses two hot wires (usually black and red) that both carry live current.
- Match line to load: Connect incoming electricity from your house breaker to the line terminals, connect outgoing wires heading to the pump motor to the load terminals, and secure all green or bare ground wires to the grounding bar.
- Verify your timer requirements: Mechanical time clocks switch power mechanically, but modern digital or smart timers almost always require a separate neutral wire connection to keep their internal clock screens running.
Pre-Wiring Safety: Shutting Off Power and Checking Wires
Working around pool equipment combines water, damp ground, and high electrical current. Before you open any metal timer box or loosen a single screw, you must make sure the circuit cannot receive power while your hands are inside the enclosure. Electricity travels through the easiest path to the earth, and standing on damp concrete or soil turns you into that path if an uninsulated wire is hot.
Follow this safety checklist before your tools touch any wiring:
- Shut off the main circuit breaker: Go to your home electrical panel and flip off the dedicated breaker for the pool pump. If your pool equipment has a separate subpanel outside, shut off the breaker inside the house first, then shut off the subpanel breaker.
- Stand on dry footing: Make sure the equipment pad is completely dry where you stand. Never work on wiring while puddles cover the concrete or while rain falls. Put on rubber-soled shoes for added protection.
- Lock or tape the breaker switch: Place a piece of electrical tape across the breaker switch in the off position so nobody inside the house accidentally flips the power back on while you work.
- Verify dead wires with a voltage detector: Open the timer door and unfasten the protective metal cover plate inside. Hold a non-contact voltage detector against every single wire nut, screw terminal, and insulated wire. The sensor should remain silent and dark. If it chirps or lights up, power is still flowing and you must locate the correct breaker switch before proceeding.
How to Identify 120-Volt Versus 240-Volt Pool Pump Wiring
Pool pumps run on either 120 volts or 240 volts. Connecting a 120-volt pump to a 240-volt supply will burn out the motor windings within seconds. Wiring a 240-volt pump to a 120-volt timer circuit will leave the motor starved for power, causing it to hum, overheat, and trip your breaker. You can confirm your setup by looking at two places: the pump motor label and your circuit breaker panel.
First, inspect the metal data plate attached to the side or top of your pump motor. The plate lists the electrical specifications, including horsepower, amperage, and operating voltage. Many pool pumps are dual-voltage motors, meaning they can run on either 120 volts or 240 volts depending on how internal jumper clips are set under the rear motor cap. Check which voltage setting your motor currently uses.
Next, look at the breaker that controls your equipment pad. A 120-volt circuit uses a single-pole breaker, which takes up one slot in your panel and has a single switch toggle. A 240-volt circuit uses a double-pole breaker, which takes up two vertical slots and features two switch toggles connected by a plastic bridge handle so both hot legs trip together.
Inside the timer enclosure, you will see specific terminal labels. Understanding these terms makes connecting your wires straightforward:
- Line: The incoming power wires coming directly from your circuit breaker panel. These wires bring electricity into the timer box.
- Load: The outgoing power wires that leave the timer box and travel into your pool pump motor.
- Neutral: The return wire in a 120-volt circuit, which is almost always wrapped in white insulation. In a 240-volt mechanical system, a neutral wire is often absent because both power wires are hot.
- Ground: The safety wire, which is either bare copper or covered in green insulation. It carries stray electrical current safely back into the ground rod if a short circuit develops.
Step-by-Step Connection for Line, Load, and Ground
Once you confirm the power is completely off and you know your system voltage, you can wire the timer box. Most mechanical timer enclosures use numbered screw terminals marked from 1 to 4, along with dedicated ground screws and neutral lugs. Follow these steps to secure every wire properly.
- Pull your wires into the enclosure: Feed the incoming power cable (from the breaker) through one bottom conduit knockout hole in the timer box. Feed the outgoing pump cable through a separate bottom knockout hole. Keep about six inches of loose wire inside the box so you have enough slack to bend each wire neatly toward its terminal. Strip about half an inch of insulation off the end of each copper conductor using wire strippers.
- Connect the ground wires first: Safety wires go in before anything else. Locate the green grounding screw or the metallic grounding bar attached directly to the metal case. Insert the bare copper or green wire from your incoming breaker cable under the grounding clip and tighten it down firmly. Do the same with the green or bare ground wire leading out to the pump. Both grounds must attach securely to the enclosure frame so the entire metal box stays grounded.
- Wire a 120-volt timer setup: On a standard 120-volt timer, connect the black incoming hot wire (from the breaker) to terminal 1, which serves as the Line terminal. Next, connect the black outgoing wire (leading to the pump) to terminal 2, which acts as the Load terminal. Connect the incoming white neutral wire from your breaker to the neutral terminal bar or the white clock motor lead, and connect the outgoing white wire from your pump directly to that same neutral connection. The timer switch opens and closes only the hot black wire, cutting power to the pump when the schedule turns off.
- Wire a 240-volt timer setup: On a 240-volt system, you have two incoming hot wires (usually one black and one red) and two outgoing hot wires heading to the pump. Connect the incoming black wire to terminal 1 (Line 1) and the incoming red wire to terminal 3 (Line 2). Connect the outgoing black wire to terminal 2 (Load 1) and the outgoing red wire to terminal 4 (Load 2). The timer switch will disconnect both hot lines simultaneously when the scheduled off cycle arrives, ensuring no live voltage reaches the motor while the timer is off.
- Secure digital timer connections: If you install a digital or smart timer box, look at the manufacturer terminal diagram on the door. Digital models contain circuit boards that need constant power to run their internal clock and wireless receivers. Most require connecting a white neutral wire directly to a dedicated neutral terminal, even on 240-volt setups. Tighten every terminal screw securely with a hand screwdriver. Loose screws create high resistance, which leads to heat buildup and melted plastic over time.
Common Wiring Mistakes to Avoid
Electrical issues around pool equipment usually come down to a few basic installation mistakes. Review these common pitfalls before closing your enclosure:
- Swapping line and load connections: If you connect the incoming power wires to the load terminals and the pump wires to the line terminals, the clock motor will only spin when the switch contacts close. When the timer switches off, power to the clock stops, freezing your timer schedule in place. Incoming power must always sit on the line terminals.
- Leaving out the neutral on digital controls: Many pool owners replacing an old mechanical dial box with a modern digital unit forget that electronics require a neutral return path to power their display screens. Without a connected neutral wire, a digital screen will stay blank or reset every time the relay switches.
- Exposing too much bare wire: Stripping more than half an inch of insulation off your wires leaves exposed copper extending outside the terminal block. In tight metal boxes, exposed copper can touch the metal housing or another terminal, causing an instant short circuit that blows your breaker.
- Mixing wire sizes: Pool pump circuits draw continuous heavy current. Make sure the wire gauge inside your conduit matches your breaker size. A 20-amp pump circuit requires at least 12-gauge wire, while a 30-amp circuit requires 10-gauge wire. Never use thin 14-gauge household lighting wire on a pool pump circuit.
First Power-Up Check and Timer Scheduling
After all wires are securely fastened to their correct terminals, check your work systematically before putting the equipment back into daily service.
- Inspect the enclosure visually: Look inside the cabinet to confirm that no stray copper wire strands poke out from under the terminal screws. Push your insulated wires toward the back of the box so they do not pinch when the protective metal cover plate swings shut. Screw the internal safety barrier into place.
- Restore power at the panel: Walk back to your circuit breaker panel and switch the pool breaker back on. If the breaker clicks off immediately with a loud snap, do not force it back on. An instant trip means there is a direct short circuit or an incorrect connection inside the box that you must check.
- Check manual operation: If the breaker stays on, walk back to the timer box. Move the manual override lever (usually a small lever located below the dial or on the digital front panel) to the ON position. Listen for the pump motor to start up cleanly without excessive humming or vibrating. Ensure water fills the pump basket properly; if air enters the suction lines, learn how to prime a pool pump without burning out the motor to protect internal seals. When water circulates through your system, check the air pressure gauge on your filter tank, following steps on how to prime a pool filter and restore water flow if you notice trapped air pockets.
- Set your daily run schedule: For a mechanical dial timer, pull the large circular dial outward and rotate it clockwise until the current time of day aligns with the fixed time pointer. Fasten the silver ON tripper clip onto the dial rim at your chosen start time (such as 8:00 AM) and fasten the gold OFF tripper clip at your chosen stop time (such as 4:00 PM). Tighten the tripper thumb screws firmly with your fingers. For digital models, use the programming buttons to set your clock time, day of the week, and preferred run duration.
Warning Signs That Mean You Should Call an Electrician
Basic timer replacement is manageable for many handy pool owners, but certain electrical symptoms indicate severe underlying problems that require a licensed professional. Stop working and call a qualified electrician if you notice any of the following conditions:
First, if your circuit breaker trips repeatedly every time the pump switches on, you may have an internal motor short, an undersized breaker, or damaged wiring inside underground conduit pipes. Forcing a tripping breaker to stay on can melt wire insulation inside your walls and cause an electrical fire.
Second, if you open an older timer box and discover blackened wire insulation, scorched terminal screws, or melted plastic around the switch mechanism, the circuit has suffered severe heat buildup. An electrician needs to evaluate whether your wire gauge, terminal lugs, or breaker sizing contributed to the overheating before a new timer is installed.
Third, if you feel a slight buzzing, tingling sensation, or static discharge when touching the metal timer enclosure or pump motor housing, turn the breaker off immediately from the house panel and do not touch the equipment pad. This sensation indicates a missing or broken ground connection, meaning stray electrical current is actively energizing the metal equipment frames. A licensed electrician must trace the grounding and bonding grid right away to eliminate shock hazards.
Choosing the Right Replacement Timer Box or Parts
Selecting the right timer hardware ensures reliable filtration and prevents premature switch burnouts. Pool pump motors create a large surge of current when they first kick on, known as startup inductive load. Because of this initial surge, standard household light timers cannot handle a pool pump. You need a dedicated, heavy-duty outdoor timer box built specifically for pool equipment.
Look for an enclosure built with weather-resistant steel or heavy-duty plastic rated for outdoor rain and sun exposure. The electrical switch rating should be at least 30 to 40 amps to comfortably handle the startup surge of 1.5-horsepower or 2-horsepower pump motors. Mechanical dial timers provide simple, long-lasting reliability with screw-on tripper pins that withstand hot outdoor equipment pads. If you prefer multiple run cycles per day, automatic daylight saving adjustments, or control from a smartphone app, choose a heavy-duty digital or wireless controller box, making sure your wiring setup has a neutral wire available to keep the electronic clock powered.
- VC Score8.4
BCP Score is a ranking system developed by bestcleanerproducts.com. BCP Score has no relationship or impact from any manufacturers or sales agent websites. Learn more
- BrandWoods

- VC Score8.4
BCP Score is a ranking system developed by bestcleanerproducts.com. BCP Score has no relationship or impact from any manufacturers or sales agent websites. Learn more
- BrandSURAIELEC

- VC Score8.4
BCP Score is a ranking system developed by bestcleanerproducts.com. BCP Score has no relationship or impact from any manufacturers or sales agent websites. Learn more
- BrandSealproof

- VC Score8.0
BCP Score is a ranking system developed by bestcleanerproducts.com. BCP Score has no relationship or impact from any manufacturers or sales agent websites. Learn more
- BrandDEWENWILS

- VC Score8.0
BCP Score is a ranking system developed by bestcleanerproducts.com. BCP Score has no relationship or impact from any manufacturers or sales agent websites. Learn more
- BrandKTNNKG

- VC Score7.8
BCP Score is a ranking system developed by bestcleanerproducts.com. BCP Score has no relationship or impact from any manufacturers or sales agent websites. Learn more
- BrandKTNNKG

- VC Score7.8
BCP Score is a ranking system developed by bestcleanerproducts.com. BCP Score has no relationship or impact from any manufacturers or sales agent websites. Learn more
- BrandSeedan

- VC Score7.8
BCP Score is a ranking system developed by bestcleanerproducts.com. BCP Score has no relationship or impact from any manufacturers or sales agent websites. Learn more
- Brandbriidea

- VC Score7.2
BCP Score is a ranking system developed by bestcleanerproducts.com. BCP Score has no relationship or impact from any manufacturers or sales agent websites. Learn more
- BrandStarwicoo
Last update on 2026-10-08 / Affiliate links / Images, Product Titles, and Product Highlights from Amazon Product Advertising API
FAQs
What happens if I accidentally reverse the line and load wires on my timer?
If you reverse these wires, your pool pump can still turn on when the switch contacts close, but your timer dial will stop spinning during scheduled off cycles. The internal clock motor relies on the line terminals for continuous power to track time. Swapping line and load cuts power to the clock whenever the pump is turned off, which freezes your schedule completely.
Does a 240-volt pool pump timer require a neutral wire?
A mechanical 240-volt timer box does not require a neutral wire because its clock motor runs directly on 240 volts drawn across the two hot line terminals. However, many modern digital and smart timer boxes require a neutral wire connection to power their low-voltage display boards and wireless chips. Check the wiring diagram inside your timer door before assuming your 240-volt setup can skip the neutral wire.
Why is my mechanical timer clock losing time or failing to switch off?
A timer that loses time usually has a worn clock drive motor, loose tripper clips on the dial rim, or line and load wires that were wired backward. If the tripper screws are loose, the dial will slide past the trip lever without pushing it hard enough to open the switch contacts. Check that your tripper pins are screwed on tightly and that the dial spins smoothly by hand when pulled forward.
Can I run my pool pump without a timer switch installed?
Yes, you can run a pool pump by wiring it directly to a dedicated on-off switch or controlling it straight from the circuit breaker. However, running a pump without an automatic timer forces you to manually switch the equipment on and off every day. Missing run cycles can turn your pool water cloudy or invite algae growth, while forgetting to shut the pump off drives up your electric bill unnecessarily.


How to Refinish a Fiberglass Pool

How Do You Keep Raccoons Out of Your Pool?

How to Fix Cyanuric Acid in Your Pool

How to Shape a Pool Cue Tip to Stop Miscues

12 Best Automatic Vacuum For Intex Above Ground Pool of 2026 To Keep Vinyl Floors Spotless

10 Best Automatic Pool Vacuum For Above Ground Pool of 2026 To End Manual Scrubbing

How Much Pool Clarifier Should You Use for Your Pool Size?

How Much Does a Pebble Tec Pool Cost to Build or Resurface?


