
How To Use An Electric Mason Jar Vacuum Sealer

How to use an electric mason jar vacuum sealer starts with clean jars, dry rims, and the right lid size. A tiny crumb on the rim can break the seal, so wipe the glass before placing the flat metal lid on top. Then set the electric sealer over the jar mouth, press it down evenly, and let the motor pull air from the jar until the device stops or signals that sealing is done.
The real trick is keeping the process boring, in a good way. Dry foods like coffee beans, rice, oats, pasta, dehydrated fruit, spices, and snack mixes usually behave well because they don’t foam, spill, or creep into the lid area. For powders, though, slow down a bit, because fine dust can get sucked upward and mess with the seal. A small paper barrier, placed above the food but below the lid, can help keep powdery ingredients from drifting where they shouldn’t.
After sealing, lift the device straight up and check the lid with your fingertip. The center should feel firm and slightly pulled down, not loose or clicky. If the lid pops when pressed, don’t shrug it off, because the jar didn’t seal properly. Try again with a cleaner rim, a fresh lid, or a little less food inside the jar.
Electric mason jar vacuum sealers are handy for pantry habits that tend to get messy fast. Half-used bags of nuts, brown sugar clumps, opened crackers, and loose tea can all turn into cabinet clutter before you know it. Moving those items into jars gives everything a cleaner home, while vacuum sealing helps slow staleness caused by extra air. It’s not magic, and it won’t turn shelf-stable storage into canning, but it does make everyday food storage feel less like a guessing game.
Leave enough headspace so the lid can seal without food pressing against it. Don’t use cracked jars, bent lids, rusty rings, or jars that were never made for mason-style sealing. Also, avoid vacuum sealing warm, wet, fermenting, or unsafe foods for room-temperature storage, because a sealed jar isn’t the same thing as heat processing. For fridge items, use common sense, label the jar, and keep an eye on freshness like you normally would.
A good routine is simple: fill, wipe, lid, seal, check, label, store. Once that rhythm clicks, mason jar vacuum sealing becomes one of those small kitchen habits that quietly saves money and cabinet space. No big production, no complicated setup, just cleaner storage and fewer sad, stale leftovers hiding in the back of the pantry.

Electric-Mason-Jar-Vacuum-Sealer, Automatic Wide Mouth and Regular Mouth Mason Jar Vacuum
View on Amazon- VC Score9.2
BCP Score is a ranking system developed by bestcleanerproducts.com. BCP Score has no relationship or impact from any manufacturers or sales agent websites. Learn more
- BrandDicorain

- VC Score9.0
BCP Score is a ranking system developed by bestcleanerproducts.com. BCP Score has no relationship or impact from any manufacturers or sales agent websites. Learn more
- BrandOXLIMKEE

- VC Score8.8
BCP Score is a ranking system developed by bestcleanerproducts.com. BCP Score has no relationship or impact from any manufacturers or sales agent websites. Learn more
- BrandLOVE MOMENT

- VC Score8.8
BCP Score is a ranking system developed by bestcleanerproducts.com. BCP Score has no relationship or impact from any manufacturers or sales agent websites. Learn more
- BrandAttikbiz

- VC Score8.8
BCP Score is a ranking system developed by bestcleanerproducts.com. BCP Score has no relationship or impact from any manufacturers or sales agent websites. Learn more
- BrandSelePow

- VC Score8.8
BCP Score is a ranking system developed by bestcleanerproducts.com. BCP Score has no relationship or impact from any manufacturers or sales agent websites. Learn more
- BrandEMSON

- VC Score8.8
BCP Score is a ranking system developed by bestcleanerproducts.com. BCP Score has no relationship or impact from any manufacturers or sales agent websites. Learn more
- BrandKITOOL

- VC Score8.8
BCP Score is a ranking system developed by bestcleanerproducts.com. BCP Score has no relationship or impact from any manufacturers or sales agent websites. Learn more
- BrandHTPOW
- VC Score8.6
BCP Score is a ranking system developed by bestcleanerproducts.com. BCP Score has no relationship or impact from any manufacturers or sales agent websites. Learn more
- BrandUNERVER

- VC Score8.6
BCP Score is a ranking system developed by bestcleanerproducts.com. BCP Score has no relationship or impact from any manufacturers or sales agent websites. Learn more
- BrandPlateful

- VC Score8.4
BCP Score is a ranking system developed by bestcleanerproducts.com. BCP Score has no relationship or impact from any manufacturers or sales agent websites. Learn more
- BrandEallpha
Last update on 2026-07-16 / Affiliate links / Images, Product Titles, and Product Highlights from Amazon Product Advertising API
How To Use An Electric Mason Jar Vacuum Sealer
Pantry clutter starts small, then turns into a tiny circus. Half-used bags of coffee, rice, oats, tea, dried herbs, and snacks get folded with clips, shoved behind jars, and forgotten until they taste flat. That’s why how to use an electric mason jar vacuum sealer matters for everyday storage: it gives loose dry goods a cleaner home, helps slow staleness, and keeps shelves from looking like a grocery bag exploded. The process is simple, but the little details, like clean rims, dry lids, and proper headspace, decide whether the seal actually holds.
Electric Mason Jar Vacuum Sealer Basics
An electric mason jar vacuum sealer pulls air out of a mason jar through a lid attachment, creating a tighter seal than simply screwing on a ring. That matters because extra air can speed up stale flavors, clumping, and loss of aroma in dry pantry foods. It’s especially helpful for coffee beans, loose tea, dehydrated fruit, nuts, crackers, pasta, cereal, and dry meal-prep ingredients. The goal isn’t to replace safe canning; the goal is neater pantry storage with less wasted food.
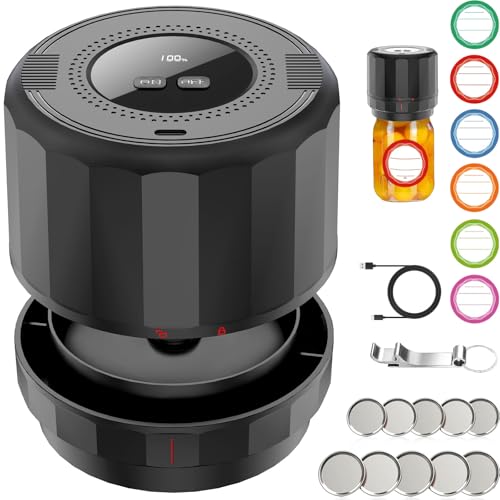
The basic setup usually includes a small electric sealing device, a jar-mouth attachment, mason jars, flat metal lids, and sometimes a USB charging cable. Wide-mouth and regular-mouth jars may need different attachments, so check the jar size before you start. A mismatch can make the device run without forming a tight seal, which feels annoying because everything looks right at first glance. For best results, match the attachment to the jar and use standard mason-style lids that sit flat.
Sealing works best with foods that are dry, cool, and not actively releasing moisture or gas. Warm food can create condensation, and moist food can raise safety issues if stored the wrong way. Fermenting foods can also build pressure, which is a bad fit for a sealed jar sitting quietly on a shelf. Keep the device for dry pantry items, fridge-friendly leftovers when appropriate, and ingredients that benefit from cleaner air control.
The biggest mistake is treating vacuum sealing like a magic safety shield. It isn’t. A sealed jar still needs smart storage, clean handling, and common sense about food type and temperature. Use labels, dates, and visible shelves so jars don’t become a museum of forgotten snacks. To keep another cleaning routine from piling up at work, rely on a practical office floor helper like best robot vacuum for office instead of letting crumbs and dust become part of the daily background noise.
Prep The Jar Before Sealing
Start with a jar that is clean, dry, and free from cracks. Run your finger around the rim and look for chips, because even a tiny nick can keep the lid from sealing evenly. Wash jars with warm soapy water, then let them dry fully before adding food. A dry jar helps protect pantry ingredients from moisture, clumping, and that stale cupboard smell nobody wants.
The lid matters just as much as the jar. A flat lid that is bent, rusty, scratched, or warped may fail even if the sealer sounds like it’s doing its job. Use a fresh or well-kept lid, then place it flat on the rim without forcing it. The screw band is not what creates the vacuum, so don’t crank it down before sealing and expect the machine to fix a bad fit.
Leave some headspace between the food and the lid. Packed-to-the-top jars can push crumbs or powder into the sealing area, and that can break the vacuum. A little space gives the lid room to pull down and helps the device work without sucking food particles upward. This is especially useful with powders, spices, and finely ground ingredients.
Powdery foods need a small extra step. Place a paper coffee filter, muffin liner, or clean paper barrier over the food before setting the lid on the jar. That barrier helps keep fine particles from reaching the lid and weakening the seal. It’s a small kitchen trick, but it saves plenty of re-sealing frustration.
Seal The Jar The Right Way
Place the flat lid on the jar first, then set the electric sealing attachment straight over the lid. Keep the device level so it can grip the jar mouth evenly. Press the button and let the motor run until the cycle finishes or the sound changes. Don’t lift the device too soon, because a rushed seal can look fine for a minute and fail later.
After the cycle ends, lift the sealer straight up instead of twisting it sideways. Press the center of the lid with one finger. A sealed lid should feel firm, slightly pulled down, and quiet. If it clicks or pops, the jar did not seal, and the fix is usually a cleaner rim, a better lid, or less food near the top.
Some jars seal on the first try, while others need a second cycle. That doesn’t always mean the machine is weak. A stubborn lid, a dusty rim, a jar filled too high, or the wrong attachment can all cause trouble. Work through those simple checks before blaming the electric mason jar vacuum sealer.
Label the jar after sealing, not before, unless the label won’t interfere with handling. Write the food name and date in plain language, because future-you won’t always remember whether that brown powder is cocoa, mushroom powder, or taco seasoning. Store sealed jars somewhere cool, dark, and dry. For kitchen messes that leave sticky residue on jars or counters, make a simple cleaning helper with how to make enzyme cleaner and keep the sealing area fresher between pantry resets.
Choose The Right Foods For Better Results
Dry goods are the sweet spot for mason jar vacuum sealing. Coffee beans, loose-leaf tea, rice, lentils, oats, pasta, cereal, dehydrated fruit, dry soup mixes, and trail mix usually seal well because they don’t foam or release much moisture. These foods also benefit from jar storage because they’re easier to see, stack, and measure. A clear jar can stop duplicate buying, which happens fast when bags disappear behind bigger bags.
Nuts and seeds are good candidates, but they still need realistic expectations. Vacuum sealing helps reduce air exposure, yet it won’t stop natural oils from aging forever. Store them in a cool spot, and use the fridge or freezer for longer storage if the food is prone to turning rancid. The sealer helps, but temperature and food freshness still matter.
Crackers, chips, and delicate snacks need gentle handling. The vacuum can crush fragile foods if the jar is overfilled or the device pulls too aggressively. Leave extra space and avoid packing the jar tight. Nobody wants beautifully sealed cracker dust.
Small aquarium supplies, craft materials, and non-food dry goods can also fit the jar system, as long as they’re clean and safe to store that way. Gravel, beads, seeds for planting, and tiny hardware pieces stay easier to sort in clear jars. For fishkeeping cleanup after storing tank supplies, a dedicated option such as best gravel vacuum for 20 gallon tank makes more sense than mixing pantry tools with aquarium chores. Keep food jars and hobby jars separate so the system stays tidy and sane.
How To Keep Mason Jar Vacuum Seals Working Longer
A successful seal is only half the job. Long-term freshness depends on how the jars are stored after sealing, how often they're opened, and whether the lids stay in good condition. A little attention now prevents frustrating surprises later, especially if you've stocked several weeks of pantry staples.
Keep sealed jars in a cool, dry cabinet away from direct sunlight. Heat gradually weakens food quality even if the vacuum remains intact, while constant humidity may encourage corrosion around metal lids. A stable storage area gives vacuum-sealed jars the best chance to maintain their seal for a longer period.
Avoid stacking heavy objects on top of mason jars. Although the glass is durable, unnecessary pressure can shift the lid or damage the sealing surface over time. Shelves with enough clearance also make it easier to spot any lid that has unexpectedly released.
Develop a simple habit of checking the center of each lid before using the contents. A lid that stays slightly concave usually indicates the seal remains intact. If the lid flexes or clicks, inspect the food


How to Refinish a Fiberglass Pool

How Do You Keep Raccoons Out of Your Pool?

How to Fix Cyanuric Acid in Your Pool

How to Shape a Pool Cue Tip to Stop Miscues

Best Far Infrared Sauna Sauna Heats: Top Picks of 2026

11 Best Far Infrared Sauna Carbon Fiber Heaters of 2026 For Balanced Full-Body Heat

11 Best Carbon Far Infrared Sauna of 2026 For Even Heat

10 Best Bluetooth Speaker For Sauna of 2026 For Heat and Steam


