
How to Remove the Filters on a Ball Vacuum Safely

Two simple latches release both vacuum filters. After unplugging the power cord, press the canister release button to lift out the upper stick filter. Next, turn the central side dial counterclockwise to pop off the round wheel shell. That exposes the circular motor filter resting inside the ball without forcing stiff plastic or risking a snap.
The exact steps depend on which filter needs washing and the size of the machine. Full-size uprights usually use a flat turn-dial, while compact models often rely on a center push tab. Trapped grit can also bind the wheel tracks, making the plastic casing feel stuck even when turned the right way. Following the proper order protects these lightweight clips and gets the cleaner breathing easily again.
Locating the Two Filters on Your Ball Vacuum
Ball upright vacuums rely on a two-stage filtration system to keep dirty air from circulating back into your home. If you only clean one filter, your machine will continue to lose suction, overheat, and struggle to pick up everyday dirt. Before you start pulling at plastic latches, you need to know exactly where both filters live on the vacuum frame.
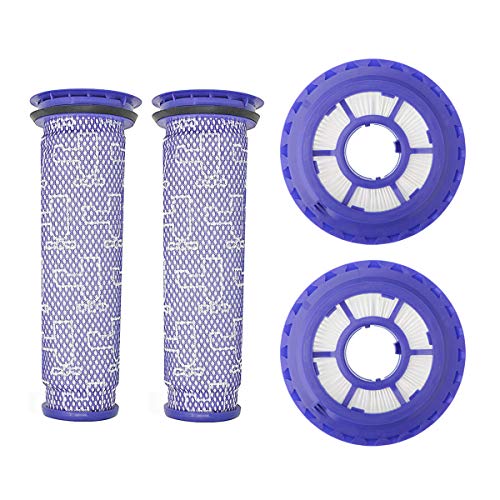
The first filter is the pre-motor filter (the washable stick filter in the dust canister). This filter sits straight up inside the central spine of the cyclone assembly (the clear dust canister and handle). When you push your vacuum across the floor, air full of dirt, hair, and crumbs spins through the clear canister first. The stick filter catches fine dust particles before the air has a chance to reach the sensitive motor fan below.
The second filter is the post-motor filter (the round filter inside the ball wheel). This filter is hidden directly inside the large rolling sphere that gives the vacuum its name and smooth steering. Many vacuum owners go years without realizing this filter even exists because it sits completely covered by the ball shell (the round side wheel cover). As air leaves the electric motor, it pushes through this dense, pleated disc to trap microscopic dander, pollen, and carbon dust before exhausting out into your room.
Depending on whether your upright is a full-size animal model or a smaller compact unit, the ball filter is located inside the side wheel cover. You do not need to pull apart the central motor housing or remove the vacuum base plate to reach it. Both filters are designed for quick maintenance at home, provided you press the right release catches and avoid twisting the wrong plastic parts.
Step-by-Step Guide to Removing Both Ball Vacuum Filters
Removing these filters requires gentle hand pressure rather than force. Vacuum bodies use molded plastic tabs that can snap if you pull them in the wrong direction. Follow these numbered steps to release both filters safely.
- Unplug the vacuum power cord from the wall outlet. Unplugging the machine eliminates the danger of an accidental start-up while your fingers are resting against the motor housing or internal release mechanisms.
- Press the canister release catch to lift the clear bin away from the vacuum body. Taking off the dust bin reduces the overall weight of the upright and gives you a clear, unobstructed view of the top filter latch.
- Pop open the canister release clip and pull out the stick pre-filter. Lifting the stick filter straight upward by its plastic pull tab keeps the rubber sealing ring intact and prevents fine dust from spilling into the empty handle cavity.
- Recline the vacuum handle and lay the machine flat on its back on a carpet or soft rug. Laying the vacuum down stabilizes the heavy rolling ball and stops the machine from rolling away while you apply pressure to the side wheel.
- Locate the central locking dial in the middle of the side ball wheel. Focusing on the center dial ensures you do not accidentally pull on the outer rubber tire tread, which is not designed to separate from the wheel shell.
- Turn the center dial counterclockwise roughly one-quarter turn until it pops loose. Turning counterclockwise backs the locking teeth out of their retaining slots without bending or snapping the plastic tabs.
- Lift the round ball shell straight outward away from the vacuum frame. Pulling straight out prevents the outer edge of the plastic wheel cover from catching or scraping against the internal wheel bearings.
- Twist the round post-filter slightly counterclockwise and pull it from the motor hub. A slight counterclockwise twist frees the filter notches from the bayonet mount so the pleated disc slides out smoothly without pulling against the rubber motor seal.
Washing, Drying, and Snapping Filters Back in Place
Once you have both filters out, proper cleaning ensures your vacuum maintains full suction power without damaging internal electronics. Wash both filters using cold tap water only. Never add dish soap, laundry detergent, or chemical cleaners. Soap leaves behind a thin chemical residue inside the micro-pores of the filter material, which restricts airflow and attracts fresh dirt much faster.
Hold the stick pre-filter under running tap water and squeeze it gently with your hands until the water pouring out of the bottom runs clear. For the round post-filter from the ball, tap it lightly against the inside edge of your sink to knock loose any dry dust caked between the pleats. Then, run cold water through the pleated paper side, rotating the disc until you see clean water emerging from all sides.
Drying is the most critical step in this entire process. You must let both filters air-dry for at least 24 full hours before reinstalling them. Place them on a dry towel in a warm room with steady airflow. Never place vacuum filters in a clothes dryer, on top of a heating radiator, or under a direct hair dryer, as high heat warps the plastic frames and melts synthetic filter fibers.
Putting a damp filter back into a ball vacuum is a quick way to destroy the machine. The vacuum motor pulls air directly through these compartments. If damp filters are in place, the motor sucks moisture droplets straight into the high-speed electrical motor. This causes electrical shorts, motor burnout, and sour mildew smells that will blow across your carpets every time you turn the unit on.
When you are ready to put everything back together, follow this quick checklist to ensure a tight seal:
- Touch check: Feel the thickest fabric layers of the stick filter and the bottom seal of the round post-filter to verify they are completely bone dry.
- Seat the round filter: Line up the notches on the round post-filter with the tabs on the ball motor hub, push it in flat, and rotate it clockwise until it stays firm.
- Fit the ball shell: Place the round side wheel cover over the ball, making sure the outer edges sit flush against the machine body without any visible gaps.
- Lock the center dial: Press the center dial inward gently and turn it clockwise until you feel and hear a positive, firm click.
- Slide in the stick filter: Drop the washable stick filter back into the canister handle, snap the top lid shut, and click the clear bin back onto the main vacuum spine.
What to Do When the Ball Dial Feels Stuck
It is very common for the center dial on the ball wheel to feel locked tight. Fine drywall dust, pet dander, and gritty soil can work their way through the wheel seam over months of use. This grit settles right into the plastic channels of the locking dial. When you try to twist it, the dry dirt acts like glue, binding the plastic surfaces together.
If your dial refuses to turn, do not reach for a flathead screwdriver, a butter knife, or metal pliers. Household vacuums are built from rigid molded plastic. Metal tools concentrate force on tiny points, which easily chews up the center slot, cracks the dial face, or snaps off the internal retaining hooks entirely. Once those internal clips snap, the wheel cover will no longer stay on the vacuum, rendering the machine unusable.
To free a stuck dial safely, place the heel of your open palm flat against the center dial. Press inward toward the body of the vacuum with steady, moderate weight, and then twist your entire hand counterclockwise. Pushing inward compresses the rubber sealing ring behind the wheel, which relieves pressure on the plastic locking teeth so they can slide out of their grooves.
If your bare hand slips against the smooth plastic, improve your grip by placing a rubber jar opener, a thick silicone baking mat, or a clean, slightly damp washcloth over the dial. The extra grip allows you to apply smooth, even torque across the entire dial surface. You can also take the pad of your thumb and tap firmly around the outer ring of the dial several times. These light taps help dislodge dried grit from the threads without cracking the casing.
Choosing a Spare Filter Set for Seamless Upkeep
Because ball vacuum filters require at least 24 hours to air-dry completely, washing your filters usually puts your vacuum out of commission for an entire weekend. If a pet tracks mud across the rug or someone spills cereal in the kitchen while your filters are drying on the counter, you cannot use the machine. Running a ball vacuum without its filters allows raw debris to slam directly into the high-speed motor fan, which can ruin the motor bearings within minutes.
Keeping a spare set of replacement filters in your utility closet solves this problem completely. When your vacuum loses suction or begins to smell stale, you simply pull out the dirty filters, drop your clean spare set into place, and get right back to vacuuming. You can then wash the dirty pair at your own pace and leave them to dry thoroughly without leaving your home unvacuumed.
When selecting a backup filter set, make sure to check the exact series of your vacuum. Full-size upright ball models use larger filters than compact or small ball units. Look for the model label on the back of your vacuum frame or underneath the base plate to confirm whether you have an Animal, Multi Floor, or compact series.
Also confirm that the replacement kit includes both the pre-motor stick filter and the round HEPA post-motor filter so you can refresh both airflow stages at the same time. If you find maintaining a heavy upright machine tiring for daily spot pickups, you might also consider keeping a lightweight cordless stick vacuum for fast spills. If you use one, reviewing how much is a new battery for a cordless vacuum can help you plan your household cleaning budget and keep all your floor equipment running smoothly.

- VC Score9.4
BCP Score is a ranking system developed by bestcleanerproducts.com. BCP Score has no relationship or impact from any manufacturers or sales agent websites. Learn more
- BrandInnovaty
- VC Score9.4
BCP Score is a ranking system developed by bestcleanerproducts.com. BCP Score has no relationship or impact from any manufacturers or sales agent websites. Learn more
- BrandLemige

- VC Score9.4
BCP Score is a ranking system developed by bestcleanerproducts.com. BCP Score has no relationship or impact from any manufacturers or sales agent websites. Learn more
- BrandFette Filter

- VC Score9.2
BCP Score is a ranking system developed by bestcleanerproducts.com. BCP Score has no relationship or impact from any manufacturers or sales agent websites. Learn more
- BrandFanulter

- VC Score9.2
BCP Score is a ranking system developed by bestcleanerproducts.com. BCP Score has no relationship or impact from any manufacturers or sales agent websites. Learn more
- BrandAunifun

- VC Score9.2
BCP Score is a ranking system developed by bestcleanerproducts.com. BCP Score has no relationship or impact from any manufacturers or sales agent websites. Learn more
- BrandJAMHER
- VC Score9.2
BCP Score is a ranking system developed by bestcleanerproducts.com. BCP Score has no relationship or impact from any manufacturers or sales agent websites. Learn more
- BrandHoover

- VC Score9.0
BCP Score is a ranking system developed by bestcleanerproducts.com. BCP Score has no relationship or impact from any manufacturers or sales agent websites. Learn more
- BrandMHYYT

- VC Score8.4
BCP Score is a ranking system developed by bestcleanerproducts.com. BCP Score has no relationship or impact from any manufacturers or sales agent websites. Learn more
- BrandKimPump
Last update on 2026-10-02 / Affiliate links / Images, Product Titles, and Product Highlights from Amazon Product Advertising API
FAQs
How often should I remove and wash my ball vacuum filters?
Wash both filters at least once every three months under normal household conditions. If you have multiple shedding pets, vacuum high-pile carpets daily, or clean up fine dust like fireplace ash, wash them once a month. Regular washing keeps the motor running cool and prevents deep clogs that permanently reduce suction.
Can I speed up drying time by using a hair dryer on low heat?
Do not use a hair dryer, microwave, or clothes dryer to dry your vacuum filters. The synthetic microfibers and pleated paper membranes deform quickly under artificial heat, ruining their ability to trap fine dust. Always let both filters air-dry naturally at room temperature for a full 24 hours.
Why is my ball vacuum making a high-pitched whistling noise after reassembly?
A whistling sound usually means one of the filter compartments is not seated flat, creating an air leak around the rubber seal. Lay the vacuum back down, turn the ball dial to remove the wheel cover, and verify the round post-filter is twisted fully into its locked position. Check that the canister stick filter lid is pressed down completely until you hear a positive click.
Do both sides of the ball wheel open up to reveal filters?
No, only one side of the ball wheel opens to house the post-motor filter. The opposite side of the ball protects the main motor assembly, wiring, and mechanical pivots. Never attempt to pry open the non-dial side of the ball wheel, as it is permanently sealed at the factory and does not contain any user-serviceable filters.


How to Refinish a Fiberglass Pool

How Do You Keep Raccoons Out of Your Pool?

How to Fix Cyanuric Acid in Your Pool

How to Shape a Pool Cue Tip to Stop Miscues

Best Far Infrared Sauna Sauna Heats: Top Picks of 2026

11 Best Far Infrared Sauna Carbon Fiber Heaters of 2026 For Balanced Full-Body Heat

11 Best Carbon Far Infrared Sauna of 2026 For Even Heat

10 Best Bluetooth Speaker For Sauna of 2026 For Heat and Steam


