
How to Open a V11 Vacuum Canister Without Breaking It

A thick clump of gray pet hair sits packed against the fill line, but the red lever refuses to budge when pushed. To empty the debris safely, disconnect the long wand, aim the base into a trash can, and push the red runner lever firmly downward until the bottom door swings open.
The exact steps shift depending on your goal and the state of the machine. Dumping out daily crumbs takes a single downward slide, but taking the clear dirt bin completely off to wash it requires clicking a hidden release tab on the runner track. Clumps of fine grit can also wedge behind the inner rubber seal, making the plastic stick. Forcing the handle when it jams risks snapping the delicate catch or cracking the canister wall. A few gentle checks will loosen the bin and get the dirt out without damaging the frame.
Take off the wand and push the red lever straight down
Emptying the clear dirt bin on your stick vacuum takes only a few seconds once you know the movement. But trying to force the parts while attachments are still locked in place is the easiest way to snap the plastic latches. Always start by clearing space around the dirt canister so the bottom door can swing open freely.
- Disconnect the long wand or cleaning head. Press the red quick-release button right where the metal stick clicks into the vacuum body. Pull the wand straight out and set it aside. If you leave the wand attached, the trapdoor cannot swing downward, and the sliding plastic track can bind against the metal tube.
- Hold the machine over a trash can. Hold the vacuum handle firmly with one hand. Point the front opening of the clear dirt bin straight down into your trash can. Lowering the canister deep into the bag before you open it keeps fine dust from billowing back up into your face.
- Find the red runner lever. Look at the lower side of the vacuum body, right beneath the clear canister. You will see a flat red lever designed for your thumb or the palm of your hand.
- Push the red lever firmly down toward the trash. Push the lever straight forward along the body of the machine in one smooth, confident stroke. As you push, the clear dirt bin will slide forward along its track. This sliding motion pushes dirt and hair down past the inner metal mesh filter screen (the shroud).
- Let the bottom door drop open. At the very end of the sliding motion, the red lever will trigger the latch at the base of the bin. The clear door will pop open automatically with a spring-loaded snap, dropping the trapped debris directly into the trash.
- Clear any clinging debris. Shake the machine gently up and down over the trash to dislodge stubborn clumps of dust or hair. You can also tap the side of the clear bin lightly with your palm to knock loose stubborn grit.
- Close the canister. Push the bottom door back up with your fingers until you hear it click firmly shut. Then slide the clear dirt bin back up toward the handle until the red lever locks back into its starting position.
Press the hidden track release catch to slide the bin completely off
Emptying daily debris is simple, but trapped dirt often collects behind the central shroud. When fine dust builds up behind the clear plastic walls or pet hair wraps tightly around the interior screen, you need to detach the clear dirt bin entirely from the vacuum body.
- Slide the bin into the open position first. Hold the vacuum over a flat surface or a trash bin. Push the red release lever all the way down so the bottom door pops open, exactly as you would when dumping dirt.
- Look for the secondary red release catch. With the bin extended all the way forward, look at the exposed sliding plastic track (the bin runner) on the underside of the vacuum spine. You will spot a small, secondary red tab marked with a tiny white or raised arrow.
- Press and hold the track release tab. Press this small red catch firmly inward with your thumb. This tab acts as a safety stop that prevents the bin from flying off during normal trash dumping. Holding it down retracts the plastic stop.
- Slide the clear dirt bin straight off the rail. While keeping that small release tab pressed down, pull the clear dirt bin forward and slide it completely off the runner. Pull straight out along the line of the vacuum body.
- Keep the bin level as it releases. Pull the bin with smooth, even pressure. Never twist the bin from side to side, and never yank it upward at an angle. The plastic tracks that guide the bin are narrow, and twisting them can crack the guide rails instantly.
Clear trapped hair and dust if the sliding track feels stuck
When the sliding mechanism locks up, your first instinct might be to pull harder on the red lever. Doing that almost always breaks the internal lever pivot or bends the track out of shape. A stuck canister is almost always caused by trapped debris, not a mechanical failure in the motor.
Before you apply heavy force, follow this checklist to safely free a jammed dirt bin:
- Check for trapped pet fur around the inner metal mesh filter screen. Long hair often tangles around the shroud, creating a tight ring of compressed fluff. This clump wedges against the inside of the clear cylinder and acts like a brake. Reach up through the open bottom lid with a wooden chopstick or your fingers to tease the hairball out before pushing the bin any further.
- Inspect the rubber sealing ring for bunching. The top of the cyclone assembly features a flexible rubber sealing ring (the gasket) that keeps suction airtight. If fine construction dust or plaster powder coats this seal, it can roll over on itself or grab against the clear plastic. Never force the bin against a rolled seal; gently push the canister back up slightly, wipe away loose dust with a dry cloth, and try sliding it down again.
- Clear the runner tracks of grit. Tiny pebbles, dried cat litter, and coarse dirt can tumble into the sliding plastic track grooves. Take an old, dry toothbrush and sweep out the exposed channels on both sides of the machine spine.
- Check the bottom flap hinge. Sometimes the spring-loaded door catches on an oversized item inside the bin, such as a bottle cap or a clump of paper. If the door cannot swing free at the end of the slide, the entire lever mechanism will lock up. Use a pencil to nudge whatever is blocking the hinge from the inside.
- Never spray wet lubricants onto the runners. If the track feels stiff, you might be tempted to reach for silicone spray, cooking oil, or WD-40. Avoid this completely. Wet lubricants mix with incoming household dust to create a sticky paste that will permanently ruin the sliding action and attract grime into the vacuum motor.
Wipe the clear bin clean and slide it back along the guide tracks
Once you have removed the clear dirt bin from the machine, you will probably want to clean off the fine layer of gray dust coating the inside. Keeping the plastic clear makes it easy to monitor dirt levels, but you must be careful about how you clean it.
The safest way to clean the clear canister is with a soft, damp cloth or a microfiber towel. Wipe out the inside and outside of the cylinder, then dry it immediately with a fresh towel. The manufacturer advises against soaking the bin in soapy water, washing it in a sink, or putting it in a dishwasher. Dishwashers use high heat that warps the clear acrylic, ruining the airtight fit.
If you choose to rinse the bin under cold running tap water to remove sticky spills, keep these precautions in mind:
- Remove the bin from the vacuum first. Never let water get near the vacuum handle, motor body, battery terminals, or the metal shroud. Moisture inside the electronic components can burn out the motor.
- Skip harsh cleaning chemicals. Do not use bleach, window sprays, or scouring powders. Harsh detergents can turn the clear plastic cloudy, degrade the rubber seals, and make the latch brittle. Stick to cool tap water or a drop of mild dish soap on a damp sponge.
- Let the canister air-dry for at least 24 hours. The latch hinge and rubber sealing ring can trap water droplets in tiny crevices. If you put a damp bin back onto the vacuum, the motor will suck that moisture straight into the internal filter, causing foul mildew odors and potential motor damage. Set the bin on a towel in a warm, dry room until every drop has evaporated.
Once the clear dirt bin is completely dry, you can reattach it to the vacuum body. Line up the small plastic guide rails on the inside of the bin with the matching channels on the vacuum runner. Hold the bin level and slide it straight back toward the vacuum handle.
Push the bin until you feel it click firmly into place. The primary red lever will pop back into its locked position. Finally, swing the bottom flap closed and press the center of the door until the latch snaps securely shut. Give the bin a light tug forward to confirm it is locked onto the spine before starting your cleaning session.
Replace a cracked bin or torn seal before you lose suction
If your vacuum canister was forced while jammed, plastic parts may have snapped. A cracked canister body, a snapped red release lever, or a torn rubber sealing ring will cause immediate performance issues. When air leaks into the canister through a broken latch or split seal, the vacuum loses its cyclonic suction, causing the motor to pulse and drop debris back onto your floor.
You do not need to replace the entire vacuum cleaner if a latch breaks or the clear plastic cracks. Individual replacement canisters, upgraded release levers, and fresh rubber sealing rings are readily available. Swapping in a replacement part takes just a few minutes and restores full suction performance.
Before ordering a replacement canister or seal, verify your exact vacuum specifications:
- Confirm your bin size and model code. Most standard stick vacuums in this series use a 4.45-inch diameter canister (commonly matched with model codes like SV14, SV15, or SV22). However, large-capacity outsize editions use a noticeably wider and longer canister. Standard replacement bins will not fit an outsize frame, so check the label on your battery or the width of your current canister before choosing a part.
- Look for reinforced release levers. Many replacement bins and standalone release levers feature upgraded pull-plate designs. These wider levers distribute thumb pressure across a thicker plastic base, reducing the risk of the lever snapping off during stubborn bin openings.
- Check the sealing ring assembly. If your vacuum runs but whines with a high-pitched whistle or pulses intermittently, inspect the black rubber ring at the top of the cyclone body. If this gasket is torn or detached, replace the top sealing ring assembly. Many replacement ring kits include the small Torx screwdriver needed to remove the mounting screws safely.
Keeping your vacuum hardware in good repair prevents strain on the motor and battery pack. If your machine is showing its age across multiple components, it helps to understand how much a new battery for a cordless vacuum costs before deciding whether to repair or upgrade your setup. You can also look into what is the lightest cordless vacuum cleaner in 2026 if you find your current stick vacuum too heavy to manage comfortably while emptying.
Choose the right replacement canister and sealing parts
When shopping for a replacement vacuum head, canister, or dirt cup assembly, compatibility is the most important factor. Stick vacuum parts are precision-molded to create an airtight seal, so parts made for older product generations will not lock onto your machine.
Look for replacement canisters that explicitly list your vacuum series and include the internal rubber sealing gasket already installed. Having the gasket pre-fitted saves you from having to transfer delicate rubber rings from your damaged bin. If you only have a broken red trigger handle, standalone replacement switches let you repair the opening latch without buying a whole new clear bin.
Always verify the attachment method on your vacuum handle before purchasing replacement hardware. Check whether your machine uses a standard screw-in battery or a click-in battery pack, as subtle changes in the handle molding can affect how the top lip of the canister locks into place.

- VC Score9.8
BCP Score is a ranking system developed by bestcleanerproducts.com. BCP Score has no relationship or impact from any manufacturers or sales agent websites. Learn more
- BrandLemige

- VC Score9.8
BCP Score is a ranking system developed by bestcleanerproducts.com. BCP Score has no relationship or impact from any manufacturers or sales agent websites. Learn more
- BrandSpofan

- VC Score9.6
BCP Score is a ranking system developed by bestcleanerproducts.com. BCP Score has no relationship or impact from any manufacturers or sales agent websites. Learn more
- BrandKuflant

- VC Score9.4
BCP Score is a ranking system developed by bestcleanerproducts.com. BCP Score has no relationship or impact from any manufacturers or sales agent websites. Learn more
- BrandWYWY.Wide

- VC Score8.8
BCP Score is a ranking system developed by bestcleanerproducts.com. BCP Score has no relationship or impact from any manufacturers or sales agent websites. Learn more
- BrandWYWY.Wide

- VC Score8.8
BCP Score is a ranking system developed by bestcleanerproducts.com. BCP Score has no relationship or impact from any manufacturers or sales agent websites. Learn more
- BrandWYWY.Wide

- VC Score8.4
BCP Score is a ranking system developed by bestcleanerproducts.com. BCP Score has no relationship or impact from any manufacturers or sales agent websites. Learn more
- BrandQINAN
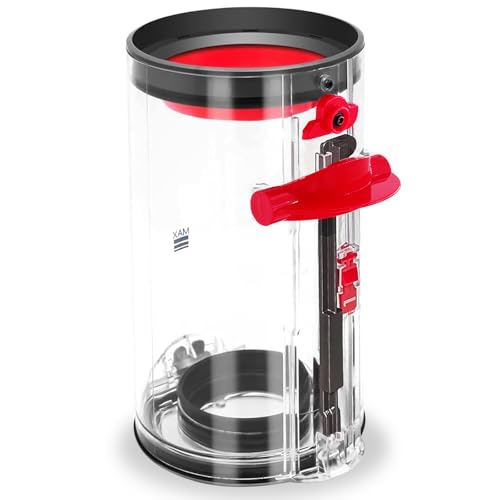
- VC Score8.2
BCP Score is a ranking system developed by bestcleanerproducts.com. BCP Score has no relationship or impact from any manufacturers or sales agent websites. Learn more
- BrandSiseayu

- VC Score7.8
BCP Score is a ranking system developed by bestcleanerproducts.com. BCP Score has no relationship or impact from any manufacturers or sales agent websites. Learn more
- BrandWYWY.Wide

- VC Score7.8
BCP Score is a ranking system developed by bestcleanerproducts.com. BCP Score has no relationship or impact from any manufacturers or sales agent websites. Learn more
- BrandAila oh Buy
Last update on 2026-10-20 / Affiliate links / Images, Product Titles, and Product Highlights from Amazon Product Advertising API
FAQs
Can I wash my clear vacuum canister with soap and water?
You can wipe the clear bin with a damp cloth, but washing it submerged in soapy water is not recommended. Water can pool inside the spring mechanisms of the release lever and damage internal rubber seals. If you do rinse the bin with plain cold water, let it air-dry completely for at least 24 hours before reattaching it to the machine.
Why will the bottom lid of my vacuum canister not click shut?
The bottom flap usually fails to lock because fine dirt or hair is packed into the small plastic latch notch. Inspect the front rim of the door and scrape away any crusted dust with a toothpick. Also verify that the clear bin is pushed all the way back against the vacuum handle; if the bin is sitting forward even a millimeter, the door latch cannot engage.
How do I know if my vacuum canister sealing ring is damaged?
A damaged sealing ring will cause a noticeable loss of suction power and often makes the vacuum motor pulse on and off during use. Slide the bin off and inspect the black rubber gasket around the top of the cyclone body. If you see tears, dry rot, missing chunks, or a folded edge that lets air bypass the bin, the sealing ring needs to be replaced.
What should I do if the red bin release lever snaps off completely?
If the external red lever breaks off, you will not be able to slide the canister open using normal thumb pressure. You can manually trip the small release tab under the runner using a flat-head screwdriver to remove the bin. Once the bin is off, install an upgraded replacement release lever switch or snap on a new complete canister assembly to restore normal operation.


How to Refinish a Fiberglass Pool

How Do You Keep Raccoons Out of Your Pool?

How to Fix Cyanuric Acid in Your Pool

How to Shape a Pool Cue Tip to Stop Miscues

Best Far Infrared Sauna Sauna Heats: Top Picks of 2026

11 Best Far Infrared Sauna Carbon Fiber Heaters of 2026 For Balanced Full-Body Heat

11 Best Carbon Far Infrared Sauna of 2026 For Even Heat

10 Best Bluetooth Speaker For Sauna of 2026 For Heat and Steam


