
How to Change Both Filters on a Ball Vacuum

Release the bin and turn the wheel. After unplugging the power cord, press the release catch on the clear dust container to pull the stick filter from the handle. Next, twist the center locking ring on the side of the steering ball counterclockwise to remove the round exhaust filter sitting inside the wheel housing. Both pieces come free by hand, so there is never a need to force brittle plastic clips or reach for tools.
The exact fit depends on your specific vacuum size and cleaning routine. Full-size uprights carry larger casings than compact versions, so matching parts to your machine label is essential. Your timeline also matters. Rinsing original parts requires a strict 24-hour drying period before reassembly, because damp fibers will ruin the internal motor, whereas fresh replacement filters let you clean immediately. Here is the straightforward process to open, swap, and secure both sections without snapping any plastic.
The Short Version
- Unplug the machine first: Always disconnect the electrical power cord from the wall outlet before touching any latches, covers, or internal vacuum assemblies.
- Slide out the pre-motor filter: Release the clear dirt container from the vacuum spine, lift the latch at the top of the cyclone handle, and pull out the washable stick filter.
- Twist open the ball wheel: Turn the vacuum onto its side, rotate the central wheel lock counterclockwise to release the outer shell, and lift out the round disk filter.
- Wait a full 24 hours to dry: Wash both filters under cold tap water without soap, but never put damp filters back into the machine because trapped moisture destroys the electric motor.
Locating the Two Filters on an Upright Ball Vacuum
Upright ball vacuums rely on two separate filters to keep fine dirt from escaping into your living space and to stop grit from ruining the suction motor. If you have only been cleaning one of them, the other is likely packed with gray dust. Knowing where each filter lives makes regular maintenance fast and prevents unnecessary strain on the internal motor.
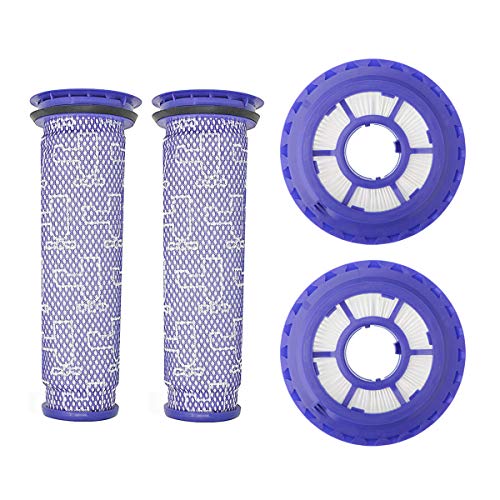
The first filter is the pre-motor filter, which is a long, washable stick filter inside the bin handle. It sits directly above the cyclone (the clear dirt container top) and catches fine fluff, hair, and dust before the airflow reaches the motor chamber. Because it catches incoming debris straight from the floor nozzle, this stick filter fills up fastest and needs the most frequent attention.
The second filter is the post-motor filter, which is a round disk filter inside the side ball wheel. It acts as an exhaust barrier, capturing microscopic particles and carbon dust generated by the high-speed electric motor. On an upright ball vacuum, this filter hides inside the large plastic sphere that rolls along the floor. Many owners miss this round filter completely because it is concealed beneath the outer wheel hub, but a clogged exhaust filter will cause the machine to run hot and lose suction just as quickly as a dirty pre-filter.
Keep in mind that upright ball vacuums house their filters differently than pull-behind canister models. On an upright ball vacuum, the steering sphere holds the exhaust filter right on the side of the machine base. Canister models often position their exhaust systems under a rear hatch on the wheeled cart. If your machine stands upright on its own two wheels and features a central steering ball, both of your filters will follow the locations outlined below.
Step-by-Step: Removing Both Filters Without Breaking Clips
Modern vacuum housings use tough but thin molded plastic. Pulling on parts the wrong way or forcing tight latches can snap small retaining tabs. Follow these simple steps to remove both filters smoothly without damaging the machine casing.
- Disconnect the power: Switch the vacuum power off and unplug the cord from the wall socket. Never open internal vacuum compartments while the machine remains connected to power.
- Release the clear dirt container: Press the red release button located on top of the carry handle. Pull the clear bin forward and away from the central vacuum spine. Place the dust bin upright on a sturdy counter or table so it does not tip over.
- Open the cyclone handle: Look at the top rim of the dust bin handle, right above the clear cyclone chamber. You will see a small plastic release clip or thumb catch. Lift this catch upward to pop the lid open. The top of the washable stick filter will now be visible.
- Pull out the washable stick filter: Grasp the plastic rim or fabric loop at the top of the long stick filter. Pull it straight upward out of the hollow handle chamber. It should slide out easily without any twisting. If it feels stuck, make sure the top lid has opened completely.
- Lay the vacuum down: Lower the vacuum handle to the floor or lay the machine flat on its side so the side of the ball wheel faces up toward you. This gives you a clear view of the locking hub without having to balance the machine upright.
- Unlock the ball wheel cover: Look at the center of the outer ball wheel. You will see a raised circular dial or a locking ring with directional markings. Turn this center dial counterclockwise about a quarter turn until it loosens. Lift the outer wheel cap straight off the vacuum body.
- Extract the round disk filter: With the wheel cover removed, the round post-motor filter sits exposed inside the wheel bay. Rotate the filter assembly counterclockwise to free its locking lugs, then pull it out of the recess. Set both filters aside for inspection.
Washing vs. Replacing: The Critical 24-Hour Drying Rule
Both the stick pre-filter and the round disk filter on a ball vacuum are designed for regular washing, but washing them incorrectly is one of the most common ways homeowners accidentally ruin their vacuums. Use this quick checklist to clean your filters safely without causing motor damage.
- Rinse with cold water only: Hold the filters under a running cold water tap. Do not use warm water, dish soap, laundry detergent, or chemical sprays. Soaps leave behind a sticky film that attracts fine grit and permanently clogs the micro-pore fabric.
- Squeeze and tap gently: Squeeze the fabric of the long stick filter under running water until the runoff is clear. Tap the plastic rim gently against the side of the sink basin to release trapped sand and drywall dust. For the round disk filter, run water through the pleated surface and shake off the excess droplets.
- Observe the mandatory 24-hour drying rule: Set both filters on a dry towel in a warm, well-ventilated spot for at least 24 full hours. Airflow is crucial. Never put filters in a clothes dryer, do not blast them with a hair dryer, and never place them directly on heating radiators. Extreme heat warps the plastic frames and melts the fine synthetic filtration fibers.
- Verify they are bone dry: Before reinstalling, press a dry paper towel against the thickest folds of the filter fabric. If any dampness appears on the paper towel, let them dry longer. Installing a damp filter pulls moisture directly into the high-speed electric motor, causing bearing rust, electrical failure, and unpleasant mildew odors.
- Know when to replace: While these filters are washable, they do not last forever. If the rubber sealing rings feel brittle or cracked, if the plastic frame snaps, or if the filter fibers remain dark gray and stiff after a thorough wash, discard them and install fresh replacements. Having an extra set of filters at home lets you use the vacuum immediately while the washed pair dries.
Reinstalling the Filters and Locking the Housings
Putting the filters back in place requires lining up specific guide tabs. Rushing this step can misalign the outer wheel cover or prevent the dust bin from seating securely against the vacuum body.
- Seat the round exhaust filter in the wheel: Take the dry round disk filter and place it into the open cavity inside the ball wheel. Check the edges for small plastic alignment notches. Turn the filter clockwise until it drops into its slots and clicks firmly into place. It must sit completely flat against the inner motor housing.
- Attach the outer ball wheel cover: Position the outer wheel shell over the installed filter. Align the center locking dial with the hub. Turn the dial clockwise until it stops and feels snug. Do not overtighten or use tools on this dial; a simple hand-tight turn is all that is required to hold the wheel cover in place.
- Slide in the stick pre-filter: Take the long, dry stick filter and slide it pointed end first down into the top opening of the cyclone handle. Push the top collar down until it sits flush with the rim of the chamber.
- Close the cyclone top cover: Press the top lid down over the stick filter until the plastic latch clicks shut. If the latch will not snap closed, remove the stick filter and verify that it is pushed all the way down into the handle shaft.
- Remount the clear dirt container: Rest the bottom edge of the dirt container on the support bracket on the lower front of the vacuum. Push the top of the bin inward toward the vacuum spine until you hear a sharp, loud click. Pull up on the carry handle to confirm that the bin is locked securely before lifting the machine.
Troubleshooting Suction Loss After a Filter Swap
If you changed or washed both filters but the vacuum still sounds strained or fails to pick up debris from rugs, the blockage is located somewhere else in the machine. A ball vacuum relies on an airtight seal and an unobstructed air path from the floor nozzle up to the cyclone. Work through these checks to track down the problem:
- Inspect the lower duct hose: Tilt the vacuum back and look at the short, flexible rubber hose that connects the floor nozzle to the ball assembly. This bend is a prime location for trapped coins, cardboard scraps, or pet hair balls. Disconnect the lower hose collar and clear any debris with your fingers.
- Clear the spinning brush roller: Flip the vacuum over to inspect the cleaner head. If thread, string, or long hair has wrapped tightly around the spinning brush roller, the roller cannot agitate carpet fibers, making it appear as though the machine has no suction. Cut tangled fibers away with scissors along the roller groove.
- Check the bin flap gasket: Look at the bottom flap of the clear dirt container. A thin rubber gasket lines this door to seal in the airflow. If grit or pet fur gets trapped under this gasket, air leaks into the bin, drastically reducing suction at the floor head. Wipe the rubber strip with a damp cloth so it closes completely airtight.
- Check the clear cyclone shroud: Fine dust can build up on the inner metal or plastic mesh screen inside the clear bin. If this screen is caked in fine powder, air cannot flow into the cyclone cone. Tap the bin gently over a trash can to knock loose the dust crust.
- Reset the thermal safety switch: If the vacuum cut off unexpectedly while running with dirty filters, the internal motor likely triggered its thermal protection switch to prevent fire. If the machine will not turn back on, unplug it from the wall outlet and let it rest undisturbed for 45 minutes to allow the safety switch to cool and reset.
For heavy liquid spills or deeply set carpet dirt, a dry upright vacuum should never be used. Sucking up liquids into a dry ball vacuum ruins the paper filters instantly and can short out the motor. In those situations, using a dedicated carpet stain cleaner for pet messes is the proper way to wash and extract wet debris safely. In addition, if carrying a heavy upright machine up and down stairs just to clean its filters feels exhausting, learning what is the lightest cordless vacuum cleaner in 2026 can help you decide whether a lightweight stick unit fits your daily routine better.
Choosing the Right Replacement Filter Kit
When shopping for replacement filters for your ball vacuum, selecting the correct match is essential for maintaining strong airflow and proper motor cooling. Vacuum filtration sets are engineered around specific shell designs, and buying an incompatible size will leave you with filters that either rattle loose or refuse to latch shut.
Always locate the exact model sticker on your vacuum before ordering parts. On upright ball machines, this white or silver sticker is usually positioned on the lower spine behind the clear dust container, or on the underside of the ball base. Standard full-size ball vacuums share a specific stick filter length and ball wheel diameter, while compact or canister versions use noticeably shorter filter cartridges.
Look for replacement sets that bundle both the washable stick pre-filter and the round exhaust disk filter together. Purchasing them as a matched pair ensures consistent airflow across both sides of the motor. A spare filter kit also eliminates machine downtime entirely. While one pair is drying on the counter for its mandatory 24 hours, the second pair stays inside the vacuum so your cleaning schedule never gets interrupted.

- VC Score9.8
BCP Score is a ranking system developed by bestcleanerproducts.com. BCP Score has no relationship or impact from any manufacturers or sales agent websites. Learn more
- Brandisinlive

- VC Score9.4
BCP Score is a ranking system developed by bestcleanerproducts.com. BCP Score has no relationship or impact from any manufacturers or sales agent websites. Learn more
- BrandInnovaty
- VC Score9.4
BCP Score is a ranking system developed by bestcleanerproducts.com. BCP Score has no relationship or impact from any manufacturers or sales agent websites. Learn more
- BrandLemige

- VC Score9.4
BCP Score is a ranking system developed by bestcleanerproducts.com. BCP Score has no relationship or impact from any manufacturers or sales agent websites. Learn more
- BrandSyxtidy

- VC Score9.2
BCP Score is a ranking system developed by bestcleanerproducts.com. BCP Score has no relationship or impact from any manufacturers or sales agent websites. Learn more
- BrandFanulter

- VC Score9.2
BCP Score is a ranking system developed by bestcleanerproducts.com. BCP Score has no relationship or impact from any manufacturers or sales agent websites. Learn more
- BrandAunifun

- VC Score9.2
BCP Score is a ranking system developed by bestcleanerproducts.com. BCP Score has no relationship or impact from any manufacturers or sales agent websites. Learn more
- BrandZibopon

- VC Score9.2
BCP Score is a ranking system developed by bestcleanerproducts.com. BCP Score has no relationship or impact from any manufacturers or sales agent websites. Learn more
- BrandKaulolado

- VC Score9.2
BCP Score is a ranking system developed by bestcleanerproducts.com. BCP Score has no relationship or impact from any manufacturers or sales agent websites. Learn more
- BrandLeadaybetter

- VC Score6.0
BCP Score is a ranking system developed by bestcleanerproducts.com. BCP Score has no relationship or impact from any manufacturers or sales agent websites. Learn more
- Brandbuy parts
Last update on 2026-10-01 / Affiliate links / Images, Product Titles, and Product Highlights from Amazon Product Advertising API
FAQs
How often should I clean the filters on a ball vacuum?
For standard household use, wash both the stick pre-filter and the round ball wheel filter at least once every three months. If you have multiple shedding pets, vacuum high-pile carpets daily, or clean up fine construction dust, check and rinse the filters every month to keep the motor running cool.
Can I speed up filter drying with a hair dryer?
No, you should never use a hair dryer, oven, or clothes dryer to speed up the process. The concentrated heat will melt the fine synthetic fibers and warp the plastic outer frames, making it impossible to latch the filters back into the vacuum housings. Always allow them to air dry on a towel for 24 full hours.
Why won't the ball wheel cover twist back onto the vacuum?
The ball wheel cover will not turn if the round exhaust filter inside is misaligned. Remove the cover, pull out the round filter, and check that its plastic guide tabs are seated squarely into the slots on the motor housing. Once the filter is clicked into its locked position, the outer shell will slip on and twist shut easily.
How do I know if my vacuum filters need to be thrown away?
Replace your filters if the synthetic fabric stays discolored and rigid after washing, or if the vacuum emits a sour, musty smell while running. You should also discard any filter that shows torn seams, holes in the filter media, or cracked rubber gaskets, as damaged filters allow grit to enter the motor chamber directly.


How to Refinish a Fiberglass Pool

How Do You Keep Raccoons Out of Your Pool?

How to Fix Cyanuric Acid in Your Pool

How to Shape a Pool Cue Tip to Stop Miscues

Best Far Infrared Sauna Sauna Heats: Top Picks of 2026

11 Best Far Infrared Sauna Carbon Fiber Heaters of 2026 For Balanced Full-Body Heat

11 Best Carbon Far Infrared Sauna of 2026 For Even Heat

10 Best Bluetooth Speaker For Sauna of 2026 For Heat and Steam


